Battery switch on travel trailer function is crucial for managing your RV’s power. Understanding how to use your battery switch – whether it’s a simple disconnect or a more complex 1-2-both system – is essential for preventing battery drain, protecting your electrical components, and ensuring a smooth camping experience. This guide will walk you through the different types of switches, their proper operation, troubleshooting common problems, and important safety considerations.
We’ll cover everything from the basics of how a battery switch works to more advanced topics like integrating your switch with solar panels or a generator. By the end, you’ll be confident in managing your travel trailer’s electrical system and avoiding costly mistakes.
Function and Purpose of the Battery Switch
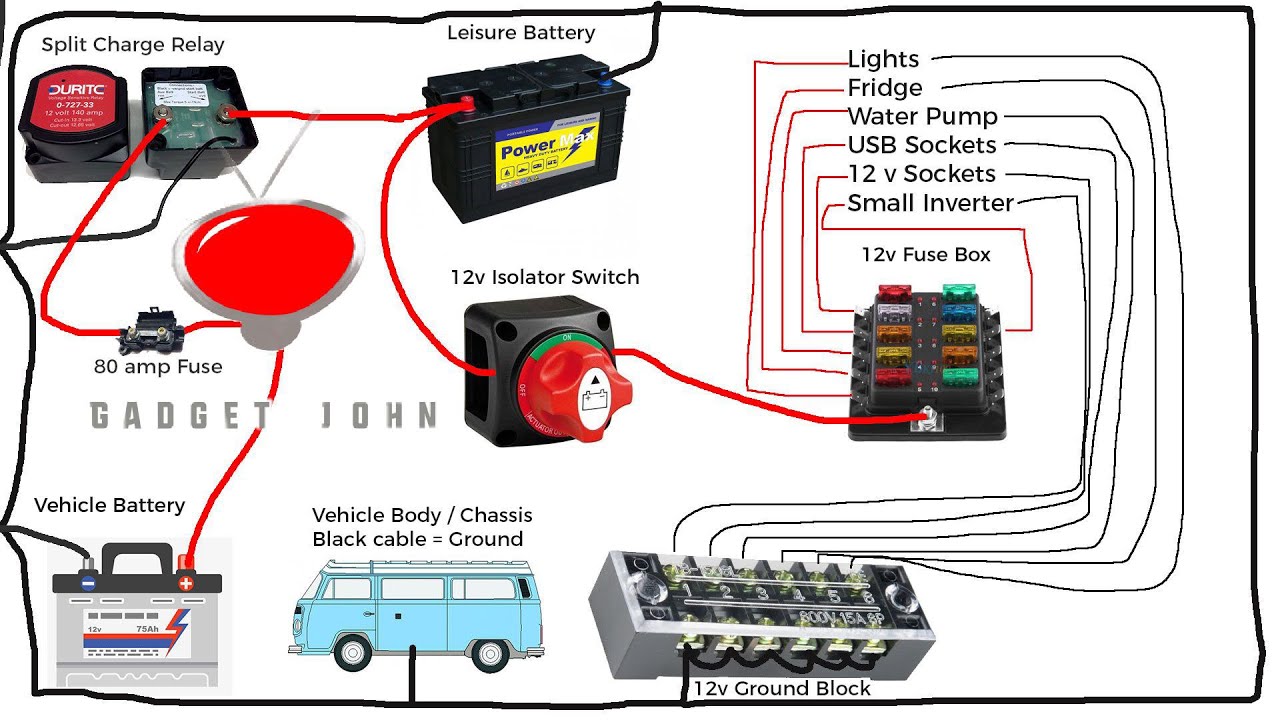
The battery switch in your travel trailer is a crucial component of its electrical system, acting as a central on/off control for your trailer’s battery. It’s a simple device with a significant impact on the longevity and performance of your trailer’s electrical system and battery. Think of it as a master power switch for your trailer’s house battery.The primary function of the battery switch is to completely disconnect the house battery from the trailer’s electrical system when not in use.
This prevents unwanted current drain, commonly known as parasitic drain, which can slowly discharge your battery over time, even when the trailer isn’t plugged into shore power or being used. This means that your lights, water pump, and other 12V appliances won’t accidentally draw power and leave you with a dead battery when you need it most. The switch also offers a way to isolate the battery for safety reasons during maintenance or repairs.
So, you’re an audiophile who loves to travel? Awesome! Check out this guide on creating the perfect audiophile travel setup to ensure your music sounds amazing on the go. Then, if you’re hitting the road in an RV, understanding your battery switch on travel trailer function is crucial for keeping your tunes playing and your lights on.
Knowing how to manage your power is just as important as packing your favorite headphones!
Battery Protection and Component Preservation
The battery switch plays a vital role in protecting both your trailer’s battery and its electrical components. By disconnecting the battery when not needed, it prevents the constant, low-level drain that can lead to premature battery failure. A perpetually drained battery suffers from sulfation, a process that reduces its capacity and lifespan. Furthermore, disconnecting the battery helps to prevent short circuits or other electrical malfunctions that could damage sensitive electronics within the trailer.
Imagine leaving a light accidentally switched on – the battery switch prevents such scenarios from causing extensive damage.
Parasitic Drain Prevention
Parasitic drain is a common problem in RVs and travel trailers. Even when seemingly switched off, small amounts of current can be drawn by devices like clocks, carbon monoxide detectors, or even poorly insulated wiring. Over time, this seemingly insignificant drain can completely deplete your battery, leaving you stranded. The battery switch acts as a safeguard against this.
By simply turning the switch to the “off” position, you effectively cut off the power supply to these devices, preventing parasitic drain and ensuring your battery remains charged and ready for use when you need it. This is particularly important for extended periods of storage when the trailer is not connected to shore power.
Using the Battery Switch
Operating your travel trailer’s battery switch is crucial for managing your power supply and preventing accidental drain. Understanding the proper procedures and best practices ensures the longevity of your batteries and prevents potential electrical issues. This section details how to safely and effectively use a typical 1-2-Both battery switch.
One-Two-Both Battery Switch Operation
A 1-2-Both battery switch allows you to select between using one battery, the other battery, or both batteries simultaneously. Understanding its operation is key to managing your power resources effectively. Improper use can lead to battery drain or damage.
So, you’re an audiophile who loves to travel? Awesome! Check out this guide on creating the perfect audiophile travel setup to ensure your tunes sound amazing wherever you go. Then, if you’re hitting the road in an RV, understanding the battery switch on travel trailer function is crucial for keeping your devices powered up.
Knowing how to manage your power is key for both your music and the rest of your adventure!
- Position 1: This position connects only the main battery (usually the house battery) to the trailer’s electrical system. The second battery remains completely disconnected. This is ideal for conserving the second battery while the trailer is stored.
- Position 2: This position connects only the second battery to the trailer’s electrical system. The main battery remains disconnected. This is useful if you have a dedicated starting battery and want to preserve the house battery’s charge.
- Position Both: This position connects both batteries in parallel to the trailer’s electrical system. This provides the maximum power output for appliances and systems that draw high amperage. This setting should be used when the trailer is in use and needs the combined power of both batteries.
- Position Off: This position disconnects both batteries from the trailer’s electrical system completely, preventing any drain on either battery while the trailer is in storage. This is crucial to prevent a completely drained battery situation.
Battery Switch and Connection Maintenance
Regular maintenance of your battery switch and its connections is vital to ensure reliable operation and prevent problems. Neglecting maintenance can lead to corrosion, poor connections, and even electrical fires.
- Regular Inspection: Visually inspect the battery switch and its connections at least once a month. Look for any signs of corrosion, loose connections, or damage to the wiring.
- Cleaning Connections: Clean any corrosion from the battery terminals and switch contacts using a wire brush and baking soda solution. Apply a corrosion inhibitor to the terminals after cleaning to help prevent future corrosion.
- Tighten Connections: Ensure all connections are tight. Loose connections can lead to increased resistance and heat buildup, potentially causing damage.
- Switch Lubrication: Periodically lubricate the switch mechanism with a suitable lubricant to ensure smooth operation. This helps prevent wear and tear.
Battery Connection/Disconnection Flowchart
A visual guide helps ensure the correct sequence of actions when connecting and disconnecting batteries. This reduces the risk of mistakes that could lead to electrical problems. Connecting Batteries (Both Position):
- Ensure the battery switch is in the “OFF” position.
- Connect the negative (-) cables to both batteries first.
- Connect the positive (+) cables to both batteries.
- Turn the battery switch to the “Both” position.
Disconnecting Batteries:
- Turn the battery switch to the “OFF” position.
- Disconnect the positive (+) cables from both batteries.
- Disconnect the negative (-) cables from both batteries.
Troubleshooting Common Battery Switch Issues
So, your travel trailer’s battery switch is giving you trouble? Don’t worry, it’s a fairly common issue. Most problems stem from simple things you can often fix yourself, saving you a costly service call. Let’s look at the most frequent culprits and how to tackle them.
Battery switch problems usually boil down to three main areas: corrosion buildup, loose connections, and switch failure itself. Addressing these systematically will usually pinpoint the problem and get your power back online.
Corrosion
Corrosion is a major enemy of electrical connections, especially in the damp environment of a travel trailer. Salt spray, moisture, and even battery acid fumes can create a film on the terminals and switch contacts that hinders current flow. This can lead to dim lights, slow charging, or even a complete power outage.
Identifying corrosion is usually straightforward; you’ll see a whitish, greenish, or bluish buildup on the battery terminals, switch terminals, and connecting wires. Sometimes it’s obvious, other times it’s hidden under insulation or connectors. Thorough inspection is key.
- Visual Inspection: Carefully examine all connections at the battery, the switch, and any wiring leading to and from the switch. Look for any signs of corrosion.
- Cleaning: Use a wire brush or a battery terminal cleaner to thoroughly scrub away any corrosion. A baking soda and water paste can also be effective. Ensure you clean both the battery terminals and the switch contacts.
- Protective Coating: After cleaning, apply a dielectric grease or anti-corrosion spray to prevent future corrosion. This creates a barrier against moisture and helps maintain a clean connection.
- Tighten Connections: Make sure all terminals are securely tightened. Loose connections can exacerbate corrosion and lead to poor conductivity. Use a wrench to ensure a firm connection, avoiding over-tightening which can damage the terminals.
Loose Connections
Even without visible corrosion, loose connections can cause intermittent power or complete failure. Vibration during travel can loosen nuts and bolts, leading to poor contact and electrical problems. This is especially true for older trailers or those that have seen extensive use.
Loose connections can manifest in various ways, including flickering lights, intermittent power to appliances, or complete power loss. Often, wiggling a connection will temporarily restore power, confirming the issue.
- Check all Connections: Inspect all connections at the battery, the switch, and any wiring related to the switch. Pay close attention to nuts and bolts securing the wires.
- Tighten Connections: Use appropriate wrenches to tighten any loose connections. Ensure a snug fit without over-tightening.
- Replace Damaged Parts: If any terminals or wires are damaged, replace them. Compromised parts can lead to persistent connection issues.
Switch Failure
Sometimes, the battery switch itself may fail. This is less common than corrosion or loose connections but can still occur, especially with older or poorly maintained switches. A failed switch may not make proper contact, resulting in inconsistent power or complete power loss.
A failed switch often requires replacement. There are no easy fixes for an internally failed switch. You may notice that the switch feels loose, doesn’t click firmly, or simply doesn’t function despite clean connections.
- Test the Switch: Try switching the battery on and off multiple times. If the switch feels loose or doesn’t click firmly, it’s likely faulty.
- Replace the Switch: If the switch is faulty, replace it with a new switch of the same type and rating. Ensure the new switch is correctly wired to maintain the same circuit configuration.
Battery Switch and its Relation to Other Electrical Systems
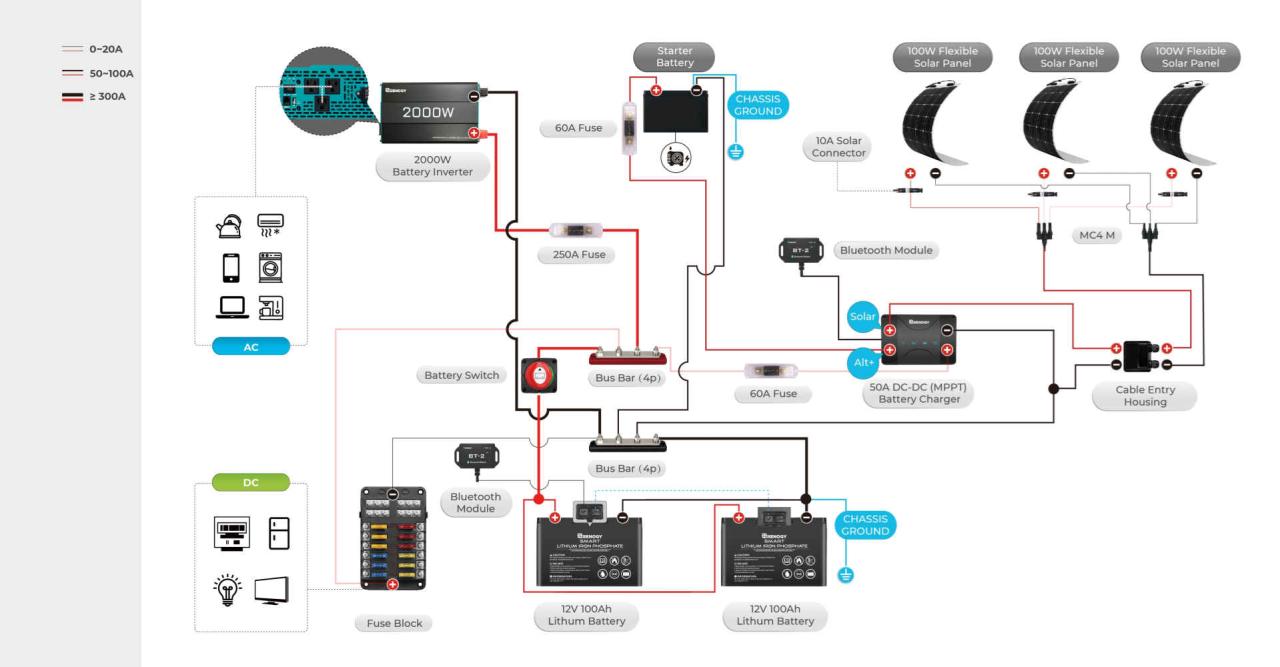
Your travel trailer’s battery switch is the central control point for your 12-volt DC system, and understanding its relationship with other electrical systems is key to efficient and safe operation. It doesn’t exist in isolation; its position directly affects how power flows between your batteries, solar panels, converter, and shore power.The battery switch acts as a gatekeeper, determining whether power flows from the batteries to the trailer’s 12V systems, and influencing how those batteries charge.
When the switch is “on,” the batteries are connected to the trailer’s DC circuits, allowing appliances to draw power. Conversely, when it’s “off,” the batteries are isolated, protecting them from discharge and preventing accidental short circuits. This interaction is crucial for managing your power resources effectively.
Battery Switch and Charging Processes
The battery switch significantly influences how your batteries charge. With the switch in the “on” position, the converter (which converts AC shore power to DC power) can charge the batteries, as can a solar panel system if connected. If the switch is “off,” the charging process is interrupted; even with shore power connected and the converter running, the batteries won’t receive a charge.
This is a vital safety feature to prevent overcharging if there is a problem with the charging system. For example, if the converter malfunctions and tries to force excessive current into the batteries, isolating the batteries via the switch can prevent damage.
Battery Switch and Shore Power Interaction
Shore power provides AC electricity to your trailer when you’re plugged into a campsite hookup. The converter then transforms this AC power into DC power to run your 12V systems and charge the batteries. The battery switch’s position affects how this power interacts with your batteries. If the switch is “on,” the converter charges the batteries while simultaneously supplying power to the 12V circuits.
If the switch is “off,” the converter still operates, but the batteries are isolated, and only the 12V circuits directly powered by the converter receive electricity. This might be useful if you’re trying to diagnose a problem, for instance.
Battery Switch and Solar Panel Interaction
Solar panels generate DC electricity. Like shore power, the battery switch dictates how this solar power affects your battery bank. When the switch is “on,” the solar panel’s power charges the batteries while also powering the 12V systems. With the switch “off,” the solar panel continues to generate power, but it’s not directed to the batteries. This is important because some solar charge controllers are designed to shut down if there’s no load (or if the battery is disconnected).
An improperly configured system may result in excess current from the solar panel if the batteries are isolated.
Effects of Incorrect Switch Usage
Incorrect battery switch usage can have several negative consequences. Leaving the switch “on” when not using the trailer for an extended period can lead to completely drained batteries. This can damage the batteries and potentially leave you stranded. Conversely, leaving the switch “off” while needing to use 12V appliances prevents you from using your battery power. Furthermore, if there’s a fault in the electrical system and the switch remains on, the fault may cause significant damage to the batteries or other components.
For example, a short circuit could lead to a fire. Always ensure the switch is in the correct position for your intended use.
Safety Considerations with Battery Switches: Battery Switch On Travel Trailer Function
Working with batteries and electrical systems in your travel trailer requires caution. Improper handling can lead to serious injury, including burns, explosions, and even death. Understanding the potential hazards and following safety procedures is crucial for protecting yourself and your equipment. This section details the necessary precautions to ensure safe operation of your battery switch.
The primary hazards associated with battery switches stem from the high voltage and current involved in your RV’s electrical system. A short circuit, accidental contact with exposed terminals, or improper handling of the switch itself can create dangerous situations. Furthermore, lead-acid batteries produce flammable hydrogen gas during charging and operation. A spark near a battery could ignite this gas, leading to an explosion.
Therefore, understanding and adhering to safety guidelines is paramount.
Potential Hazards of Improper Battery Switch Usage
Improper use of the battery switch can result in several dangerous scenarios. For example, accidentally leaving the switch in the “on” position while the trailer is not in use could drain your batteries, rendering them useless and potentially damaging them beyond repair. This could leave you stranded without power. Conversely, leaving the switch in the “off” position while attempting to use appliances could lead to unexpected power outages or damage to sensitive electronics.
Furthermore, attempting to operate the switch while wearing wet clothing or with wet hands greatly increases the risk of electric shock.
Safety Precautions When Working with the Battery Switch and Batteries, Battery switch on travel trailer function
Before working with the battery switch or batteries, always disconnect the negative (-) terminal first. This prevents accidental short circuits. When reconnecting, connect the negative terminal last. Wear appropriate safety gear, including safety glasses and gloves. Work in a well-ventilated area to prevent the accumulation of flammable hydrogen gas.
Never use a battery switch if it appears damaged or if you notice any unusual smells or sounds. Inspect the switch and its wiring regularly for any signs of damage or corrosion. If you are unsure about any aspect of operating the battery switch, consult a qualified RV technician.
Safety Warnings for User Manual
The following warnings should be prominently displayed in your travel trailer’s user manual to emphasize the importance of safe battery switch operation.
- Always disconnect the negative (-) battery terminal before performing any maintenance or repairs on the battery system.
- Wear appropriate safety glasses and gloves when working with batteries and the battery switch.
- Ensure adequate ventilation when working near batteries to avoid the risk of hydrogen gas ignition.
- Never touch the battery terminals or switch while wearing wet clothing or with wet hands.
- Inspect the battery switch and wiring regularly for any signs of damage or corrosion. Replace any damaged components immediately.
- Never attempt to operate the battery switch if it is damaged or malfunctioning.
- Keep children and pets away from batteries and the battery switch.
- Consult a qualified technician if you are unsure about any aspect of the battery system or its operation.
- Use only approved battery chargers and maintain proper charging procedures.
- In case of an accident or fire involving the battery system, immediately evacuate the area and contact emergency services.
Mastering your travel trailer’s battery switch is key to preventing frustrating electrical issues and maximizing your enjoyment on the road. From understanding the various switch types and their functions to troubleshooting common problems and prioritizing safety, this guide provides a comprehensive overview. Remember, proper maintenance and safe operation of your battery switch will ensure your trailer’s electrical system remains healthy and reliable for years to come, keeping your adventures powered up!
Top FAQs
What happens if I leave my battery switch in the “off” position for a long time?
Leaving the switch off for extended periods prevents parasitic drain, protecting your battery. However, you won’t be able to use any 12V appliances.
Can I use a battery switch in a travel trailer with only one battery?
Yes, a simple disconnect switch is suitable for single-battery systems. It provides a convenient on/off control.
How often should I check my battery switch connections for corrosion?
Inspect your connections at least once a year, or more frequently in damp climates, to prevent corrosion and ensure good electrical contact.
My battery switch feels loose. What should I do?
Tighten the switch mounting screws. If the problem persists, the switch itself might be faulty and needs replacing.
